Learn how to construct your personal air high quality meter with a Raspberry Pi and CO2 sensor
A dependable indicator of the air high quality in places of work, school rooms, or dwelling rooms is the CO2 content material.
In contemporary air, the focus of carbon dioxide is round 400 ppm. This stands for “elements per million”, on this case 400 CO2 molecules per million air molecules. Though that is solely 0.04 per cent, it has a noticeable impact.
Indoors, the focus rises quickly on account of human respiration (ie. respiratory). Surprisingly, throughout a movie screening in a movie show, CO2 ranges of a number of thousand ppm might be shortly reached. If CO2 ranges are excessive sufficient, this may result in lack of focus, tiredness, and complications.
A CO2 measuring station can inform you when it’s the proper time to open the home windows—contemporary air is required if CO2 ranges attain 1500 ppm or increased.
What you’ll want
Firstly, you want a Raspberry Pi with a fairly up-to-date Raspberry Pi OS. It doesn’t matter which Raspberry mannequin you utilize.
You additionally want a CO2 sensor. The MH-Z19C sensor from the Chinese language producer Winsen Electronics Expertise is used on this article. The MH-Z19B mannequin works in the identical method.
When shopping for, you must select a mannequin with pins, in any other case you’ll have to solder it your self. Pins or headers are small pins that you simply use to attach the sensor to the Raspberry Pi. The model with headers is offered on Amazon so be sure you select that model whenever you purchase it.
Lastly, additionally, you will want jumper wires. You will have the feminine/feminine variant for the sensor.
Total, the funding is lower than $40, whereas skilled CO2 measuring gadgets value many instances extra if you happen to had been to purchase ready-made fashions.
Necessary: To learn out the sensor, the Raspberry Pi communicates through the serial interface, which is deactivated by default. To vary this, use the software
raspi-configand choose “Serial Port” beneath “Interface Choices”.
How the sensor works
The MH-Z19C (or B) is a non-dispersive infrared sensor (NDIR). These are based mostly on the concentration-dependent absorption of electromagnetic radiation within the infrared wavelength vary. Carbon dioxide absorbs infrared radiation in a particular and measurable method.
The sunshine supply transmits IR radiation via the air to be measured by the precise sensor. A filter is connected to the entrance which permits the absorption wavelength of the goal gasoline to cross via.
If the focus will increase, the absorption will increase in line with Lambert-Beer’s regulation and the sign decreases accordingly. The sensor determines the ensuing gentle depth and converts it into ppm.
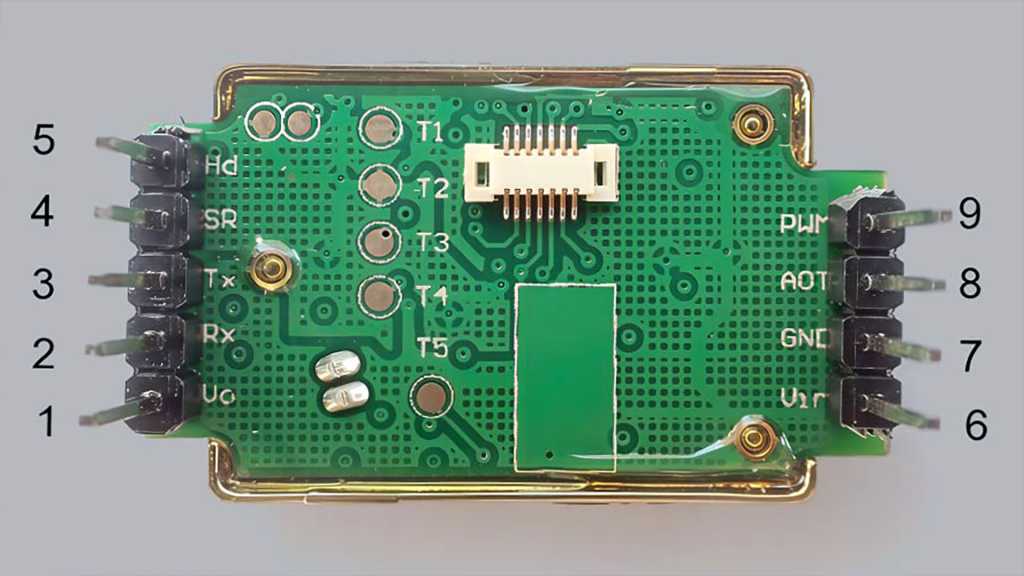
Learn how to join the sensor to the Raspberry Pi. The sensor needs to be considered from the underside.
Foundry
Establishing the circuit
To arrange the circuit, first shut down the Raspberry Pi and disconnect it from the ability provide. Then join the circuit board to the sensor. You will have 4 jumper wires feminine/feminine, i.e. with sockets at each ends.
You’ll be able to see the perform of every connection on the underside of the sensor. Join pin 6 of the sensor (labelled “VCC” or “Vin”) to pin 4 on the Raspberry Pi. That is the ability provide with 5 volts. Pin 4 is the second from the highest on the right-hand facet of the GPIO strip.
Now join pin “GND” (7) on the sensor to pin 6 on the Raspberry board. That is the earth wire. It’s situated instantly beneath pin 4.
Midway via, proceed on the opposite facet of the sensor, which has 5 connections: Pin “Rx” (2) on the sensor have to be related to pin 8 on the mini laptop, instantly beneath pin 6.
Lastly, join pin “Tx” (3) on the sensor to pin 10 on the Raspberry Pi, instantly beneath pin 8. The illustration above reveals the whole setup once more. Lastly, begin the Raspberry Pi by reconnecting it to the ability provide.
Learn out measured values
The CO2 sensor is prepared to be used. A Python script is required to learn out the present CO2 worth. Fortunately, one was developed by a Japanese developer – only for data, to elucidate the Github tackle. You put in the script along with different elements by opening a terminal on the Raspberry Pi and getting into the next command:
git clone Then change to the newly created folder “~/mh-z19” and execute the set up script:
./setup.shTo find out the present CO2 worth, use this command in future:
sudo python -m mh_z19You’ll obtain a consequence equivalent to “{“co2″: 3128}”. The unit is the present ppm of CO2.
The measured values might be mechanically displayed on-line and clearly present the impact of air flow.
Foundry
Measured values on-line
All the time studying out the measured values manually on the Raspberry Pi is annoying and too tedious in the long term. So it’s higher to show the measured values on-line over time.
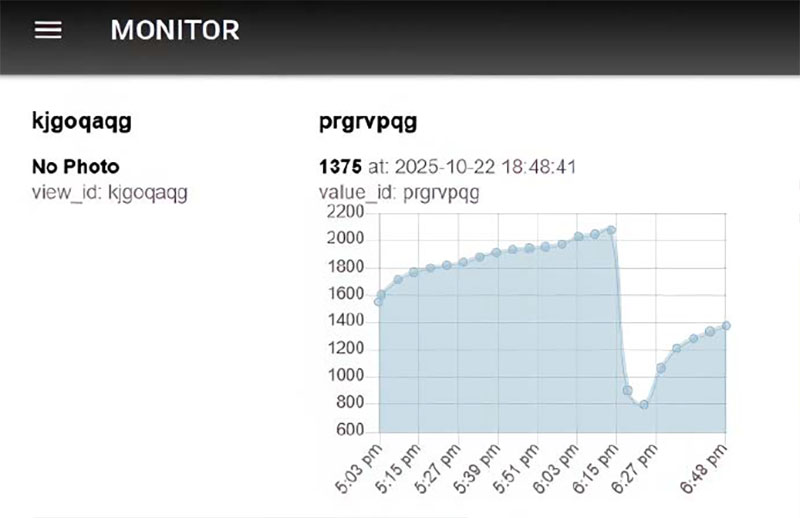
Use a free on-line service to entry the historical past of the measured values through PC or smartphone. Go to monitor3.uedasoft.com and enter an e-mail tackle and password to log in. You’ll obtain a “view_id”, which you do not want.
Click on on the menu merchandise Parts. Make a remark of the second letter mixture within the checklist, within the instance “prgrvpqg”, and set the corresponding choice to Lively. Click on on Save to finalize the setup.
Now open a terminal on the Raspberry Pi and swap again to the “mh-z19” folder. There you name the command
./setid.sh [abcdefgh]changing the sequence of letters with the eight-digit letter mixture that you’ve simply famous. This name is used to verify whether or not all the pieces is working correctly:
sudo python -m pondsliderIf the phrase “true” seems within the backside line of the output, then all the pieces is OK. As a way to repeatedly obtain measured values to any extent further and enter them within the Monitor app, enter the command
./autostart.sh --onWithin the browser, now you can see how the diagram on the Monitor web page grows by one measured worth each 5 minutes. The variety of measured values displayed might be set instantly beneath utilizing the “Settings” button.
To cowl ten hours, you want 120 values. With the diagram, you may see at a look whether or not somebody has been airing the room whilst you had been at lunch or buying.
The graph with the measured values may also be conveniently known as up with a smartphone and downloaded as a CSV file through the “Obtain” button with the intention to analyze it in Excel. After rebooting the Raspberry Pi, the measurement script restarts mechanically.
The idea might be expanded additional. With a crimson LED, an appropriate 330 Ohm resistor and a barely modified Python script, a circuit might be created during which the LED lights up as quickly because the measured worth exceeds a specified CO2 restrict worth.
This text initially appeared on our sister publication PC-WELT and was translated and localized from German.